Showing posts with label comfort food. Show all posts

5.28.2009

Chicken Noodle Soup


Any time Andy gets the sniffles, I bust this one out in some form or another...

Ingredients:

  • 1 whole chicken / *Rotisserie Chicken* (cut some corners if you're pressed for time or energy)
  • 5 carrots; half diced, half rough chopped in 3 inch pieces
  • 1 head of celery; half diced, half rough chopped in 3 inch pieces
  • 2 leeks / 1 onion; rough chop
  • 1 shallot; cut in half
  • 1 lemon
  • fresh herbs: rosemary/thyme/sage/etc.
  • H2O
  • 1/2 cup soy sauce
  • 1 teaspoon garlic and chili sauce (optional)
  • s&p
  • 1/2 package egg noodles
Instructions:
  1. Break down the whole chicken and remove the skin (if you don't know how to do this, check out the video I posted above). Salt and pepper the pieces.
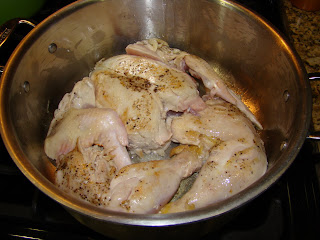
  2. Heat a large pot with a tablespoon of olive oil and brown the chicken on both sides. Set aside for later.
  3. Add the rough chopped veggies (carrot, celery, leek, shallot), reserving the smaller diced ones for a later step.
  4. When softened, add back in the chicken pieces and cover with water.
  5. Add in the herbs, soy sauce and pepper and bring to a boil, then simmer on low for 1-1 1/2 hours.
  6. Remove the chicken, then strain the liquid into a bowl and discard the veggies. Skim the fat off of the top and pour the broth back into pot.
  7. Shred the chicken (allow it to cool or use rubber gloves so that you don't burn your hands) and add it back into the pot, along with the reserved veggies.
  8. Bring to a boil and add in the egg noodles. Stir until the noodles are cooked.
  9. Taste the broth. If it needs salt or pepper, add more. For some heat, you can add the garlic chili sauce.
  10. Ladle up some of the chicken and veggies into a bowl and then top with a ladle full of the broth.
Hope this chases those sniffles away!

5.06.2009

BBQ Pulled Pork (Slow Cooker Recipe)

Hey Ya'll (when I say that, I hear Paula Dean in my head)!

How about a recipe that can cook while you're slaving away at the office? Introducing BBQ Pulled Pork straight from the Crockpot. (Don't worry, you don't get swine flu from eating pork.)

If you don't own a Crockpot, head to your choice of discount stores and pick one up. We got ours on sale a while back for about $20 at Kmart. I rarely use it for anything besides pulled pork, but for that price it is worth every penny.

The best cut to use for pulled pork is Boston Butt, which is a cut that comes from the upper part of the shoulder, near the front leg. Sometimes this cut will have all or part of the blade bone in it. My friend, Carmelli, and I picked up some ribs that were trimmed from this section at Costco. It was $14 for a "Butt" load, enough to make Carnitas one night and BBQ Pulled Pork the next. (I'll see if I can get Carmelli to do a guest post on those Carnitas. They were delicious!)

The night prior to making the pulled pork, you can use your favorite rub (homemade or store bought) and season the meat. However, I've found that this doesn't exactly add a mind-blowing additional depth of flavor, so I tend to only do it when I've really preplanned the meal. When I typically make this, I'm doing it to satisfy a craving and I pick up the pork that morning and cook it right away. I think I'll do a side-by-side taste test some other time to further answer this question. For now, here's what I did:

Ingredients:
  • Pork butt or shoulder cut ribs
  • 1 Cup apple cider vinegar or distilled white vinegar
  • 1 beer (I used an amber)
  • 1 Tbs garlic powder
  • 1/2 Tbs onion powder
  • 1 Tbs brown sugar
  • S&P
  • 1 tsp. Liquid Smoke (optional)
  • Your favorite BBQ sauce (homemade or store bought)
  • Rolls or hamburger buns
Throw the pork in the crockpot and season it with the dry ingredients. Then pour the wet ones on top. Cook on low for 8 hours, or until the meat is just about falling apart. Alternatively, you can cook it on high for about half that time.

When the pork looks to be done (again, so tender that it's barely holding together), drain out the liquid. Pull the meat apart using a fork or your fingers (if you've let it cool down) and then place your favorite BBQ sauce and the liquid smoke, if you are using it, in the pot and turn it back to low. A note on the liquid smoke... I would consider myself somewhat of a purist in the kitchen. The only frozen dinners I'll eat are Amy's Mac&Cheese. I worship fresh produce and if I were independently wealthy, I'd spend my days scouring the local Farmer's Markets for fun. That being said, Liquid Smoke adds a depth of flavor that I haven't been able to duplicate- at least not with a Crockpot. Sure, if I had a backyard and a smoker I could get cracking on the natural approach. But we're in the city. We've already set off our smoke detector using our grill on the balcony. I'm making do with the resources I have available.

Back to the basics: Cook the pork for another hour in the BBQ sauce, then serve it on either rolls or hamburger buns. I like serving it on potato rolls, which soak up the sauce and juices really nicely.

The best part about this recipe is the fact that when you come home, your house will ooze with delicious smells. During football season, I'll often get this started right before bed and then we can have it for an early lunch while we're watching the games. It's always a crowd pleaser!

You can top it with cheese, pickles, coleslaw or (as my husband has been known to do) potato chips.

I'll throw a picture up of the finished product this evening. Enjoy!

5.02.2009

Gourmet Pizza Night- The Jimmy Pie


Well, hello there blogosphere! Long time, no post. Again, my apologies. The good news is that our oven is back in commission earlier than expected. Thank goodness for warranties!!!

Last night, we had some fine folks over and I made pizza.

Here were the ingredients I used:


1 package Trader Joe's (TJ's) regular pizza dough
1 package TJ's quattro-formaggio cheese
4 cloves minced garlic
1 package proscuitto
1 log of chevre (goat cheese)
1 package asparagus
Fresh basil
Olive oil, S&P

I doubled this recipe, got a few more things for some bruschetta as well and walked out of TJ's for under $50.

Directions:
1) Let the pizza dough sit at room temperature for at least a half hour before you make the pizza. While it's resting, mince your garlic and chop your asparagus into 3/4 inch strips. Preheat the oven as high as it can go on the bake setting (set mine at 550 degrees F).
2) Cut the dough in half and stretch it into your pizza pan (this one from Bed Bath & Beyond works well and is around $10). You want it to be thin, but without holes. You may want to buy extra dough to practice this part until you get the hang of it.
3) Bake the dough for a few minutes to get it cooked enough to support the toppings. This will help give you a really nice crust.
4) Remove it from the oven and slide a spatula underneath it to loosen it from the pan.
5) Add olive oil and garlic to the crust, then top it with half the cheeses, asparagus and pieces of proscuitto. Add salt and pepper to the top to taste.
6) Place in the oven for five minutes and then when it's getting closer to done, slide it off of the pizza pan and directly onto the oven rack for some additional crisping. Bake until golden crusted and oozing with cheesy-deliciousness.
7) Use a pizza peel or a cutting board to pull it from the oven, top with freshly cut basil and dig in!

This recipe makes enough for two 14 inch pies.

3.24.2009

Burgers & Mac n' Cheese

I absolutely love Cook's Illustrated magazine. If you enjoy cooking, this is THE subscription magazine to get. They don't have any advertisements, so it is 100% devoted to food. Sign up here: The Best Cooking Magazine You'll Ever Find. Ever . They also run a PBS show called "America's Test Kitchen." Add it to your Tivo now.

Anyway, they shared a recipe for Stove Top Mac & Cheese that utilized cheddar and evaporated milk that worked out pretty decently. I built on their foundation and added some roasted garlic, truffle oil and then topped it with flavorful sea salt.

If you haven't stepped outside regular iodized salt, you need to check out all of the amazing alternatives. Grey salt, coral salt, smoked salt, chardonnay salt, Fleur de Sel, truffle salt. The list could go on and on and each is amazing in its own right.

Anyway, here are the ingredients for the mac&cheese (4-6 servings, depending on how bad your Monday was):

  • 1 Can of Evaporated milk
  • 10 oz grated cheddar cheese
  • 1 head of roasted garlic: (slice off the top of the garlic head, drizzle with olive oil, wrap in tin foil and then roast in the oven at 300 degrees for an hour and a half or until the garlic is soft and golden
  • 1 box macaroni (I used mini-shells that I found at the dollar store, but elbow or bowtie work well too)
  • 1 teaspoon truffle oil (or as much as you're craving)
  • 3 tablespoons unsalted butter
  • 1 egg
  • S&P
  1. Cook the pasta per the instructions on the box and drain (do not rinse). Place the macaroni back in the pot.
  2. In a bowl, combine the egg, milk, salt and pepper
  3. Over medium heat, melt 2 Tbsp of the butter into the pasta and then add in the egg/milk mixture.
  4. Stir in the cheese until incorporated.
  5. Mix in the roasted garlic.
  6. Add truffle oil (always add this at the last moment before serving) to taste and adjust S&P as necessary.
You can also add any of the following ingredients to "spice things up":

  • Hot sauce
  • Dry Mustard
  • Fresh herbs (thyme, sage and chives all work nicely)
  • chopped mushrooms
  • steamed broccoli florets
  • sun dried tomatoes
  • cooked and chopped bacon
  • sauteed shallots
  • additional cheeses: Parmeggiano-Reggiano, Fontina, Gruyere, Pecorino, etc.
The reason this recipe uses condensed milk versus regular whole milk is because it allows for the cheese to melt with a less "grainy" consistency. If you were doing a baked mac&cheese, you will find it's better to start with a bechamel sauce. More on that in a future post.

Here's what I did for the burgers:

  • ground beef, separated into ice-cream scoop's worth of little balls (like meatballs)
  • american cheese
  • thinly-sliced onions
  • potato rolls (in my case, we didn't have any at the market, so I simply used dinner rolls
  1. Warm a skillet over medium-low heat.
  2. Place the "meatballs" in the skillet and then top with onions and pat down to form patties (see picture below).
  3. When they have been in the pan for 4.5 minutes (or just until they start to get cooked on the bottom), flip them over so that the meat is resting in a sea of onions, then set a piece of cheese (or 3) on the meat, place the buns (sliced, top over the bottom) on the top and let cook for another 3 minutes or so.
  4. Once they appear done, simply pull the top of the bun off and then slide the onions, burger, cheese and bottom bun into a full burger form. The cheesy goodness that has accumulated will seep into the bun and render it moist and delicious.
Some helpful hints to keep in mind ...
  • I was consuming some "adult beverages" whilst cooking this meal. Thus, I wasn't paying as much attention to the burgers as I should have been. If your pan is too hot, the burgers can get dried out. The idea is too almost "steam" them in the pan. They turn out amazingly tender and moist this way. And because they are so small, they cook quickly.
  • Let the ground beef sit out for a little while to get to room temperature. This makes the fat in the beef melt deliciously into the burger.
  • The best bread to use is the following: Martin's Potato Rolls. That's right, they have the website on "Potato Rolls." You know they're legit.
The way that the grill will caramelize the onions while cooking the beef is oustandingly amazing. However, as much as these "at home version" members of the White Manna fan-club can be satisfying, nothing, and I mean NOTHING can compare to the real deal. So get your ass down to Hackensack for the ultimate experience in burgers.


Peace, love and grill grease,
-M